Calipers
The caliper is a tool used for making precise measurements of objects (usually precise to the thousandth of an inch in the US i.e. 0.001"). In aerospace manufacturing, where tolerances are extremely tight, calipers are used to determine if a series of parts that are to be used within a jet turbine meet the specifications set by the engineers who designed the engine. This report details how to use a caliper, which is fundamental for almost all engineers and scientists.
How calipers work
A caliper usually has three modes of measurement: outer dimension measurement, inner dimension measurement and depth measurement.
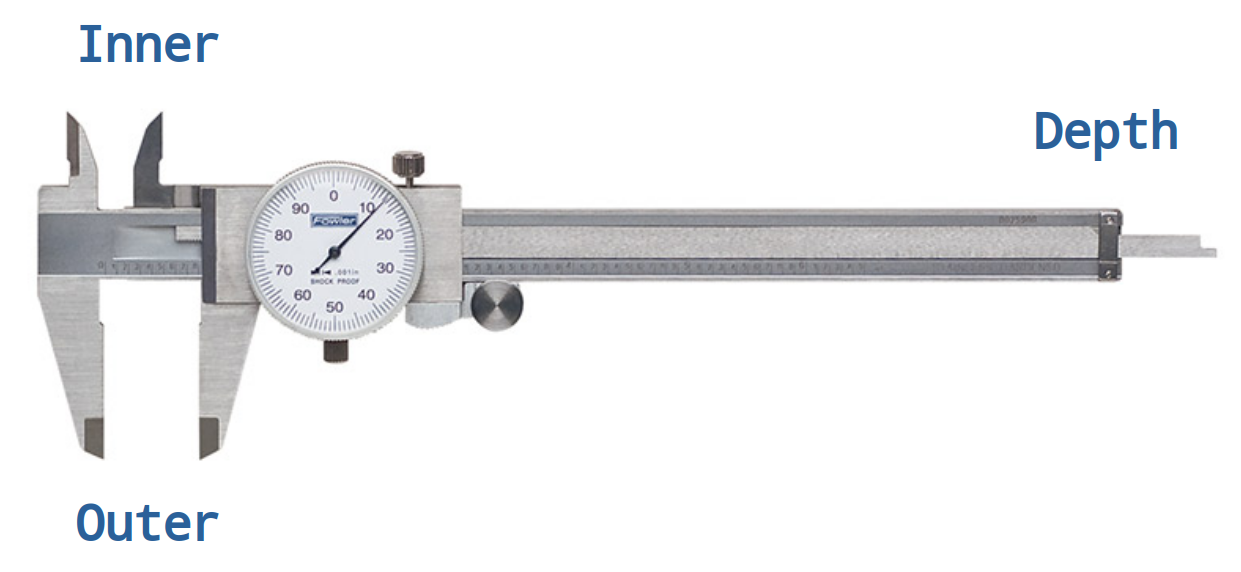
Figure 1: The three parts of the caliper used to make measurements and which types of measurements they make.
Making measurements
If it is your first time using a set of calipers, you will want to verify that the measurements they report are accurate. One way to do this is to measure an object with a known size, several times. If the calipers report the same measurement repeatedly (five or so times in a row without fail), then it would be safe to assume they are in good working order. If the measurement changes between measurements, then you may need to service the calipers (which will be discussed later) or you may need to adjust the way you are taking the measurements.
Here are a few pointers to help you reduce the amount of error you introduce into any measurements you make:
- Zero your calipers or account for zero error prior to making measurements. Do not force the calipers shut any more than you would while making measurements. It is important to be consistent.
- When making a measurement, do not force the calipers closed more and more. They will bend which will give you incorrect measurements. It is good practice to close the calipers with the same closing force for every measurement you make to reduce error.
- Practice; this will build your confidence and ensure that you are making measurements the same way every time.
Reading results
Calipers can report digital read-outs or analog readouts. Reading a measurement from digital calipers is a straightforward process. However, reading analog calipers is not so straightforward. There are two common types of analog calipers: Vernier and dial. Let’s discuss how to read measurements from these analog calipers, separately, below.
Vernier
Reading the results from Vernier calipers can seem daunting if you have never done it before. However, learning a few tricks can make this type of caliper easy to read. The process is as follows:
- Make the measurement you intend to make. It helps to lock the calipers in place once you have your measurement.
- Look at the normal scale of the calipers and read the measurement at the zero of the Vernier scale. It will likely be between two values. The whole number below the zero is your first set of digits (see figure 2 below for a clear example). The relative location of the zero will give you an idea of how to make the next measurement.
- Observe the Vernier scale. Note where a line on this scale lines up vertically with a line on the normal scale. This is the digit that follows the first set.
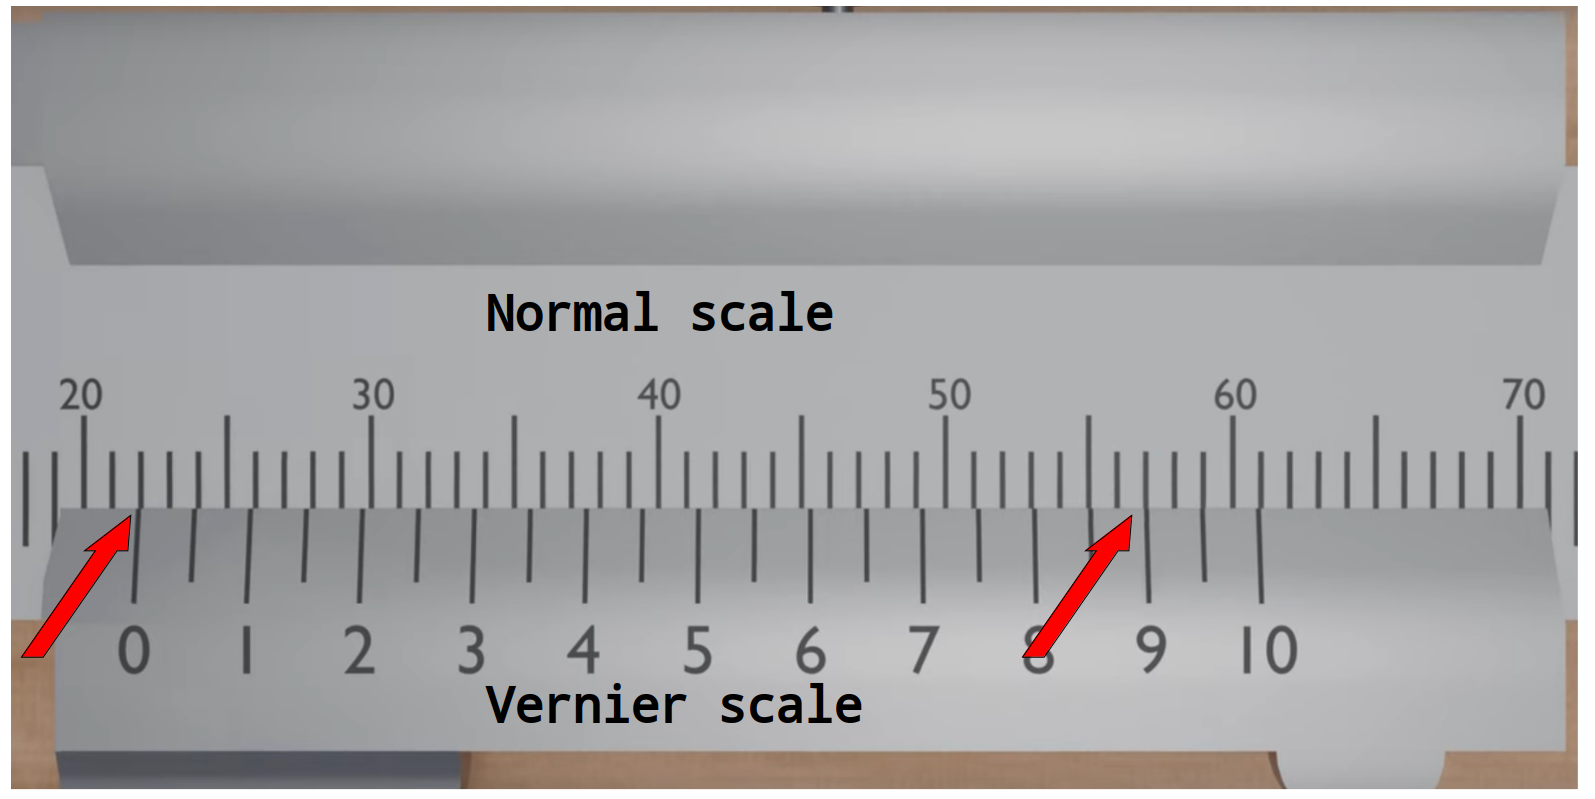
Figure 2: Notice the normal and Vernier scale. The first digits of the measurement are 21 because this is the whole number below zero on the vernier scale (left-most red arrow). However, notice that zero is close to 22. Which tells us that measurement is closer to 22 than 21. This hint means that I would start reading the Vernier scale from the right until I found where its line vertically aligned with a line on the normal scale. This value is 9 which means the third digit in the measurement is a 9 (right-most red arrow). The full measurement taken from the caliper below would be 0.219 (units vary).
Dial
Reading a dial caliper is a bit more involved than a digital, but take your time an it will all be fine.
- Read the main scale measurement. The measurement you should take would be largest fully visible line on the main scale when observing the caliper head on. This value would be 13 in the example below.
- Read the dial measurement. On this measurement you may estimate the value based on the position of the dial. Notice that the hand on the dial in the example below is close to zero, but just below it. I would read the value as 0.99 where the second nine is a guess based on the dial’s position.
- Add the two measurements together and remember to report units. In this example, the final measurement would be 13.99 mm.
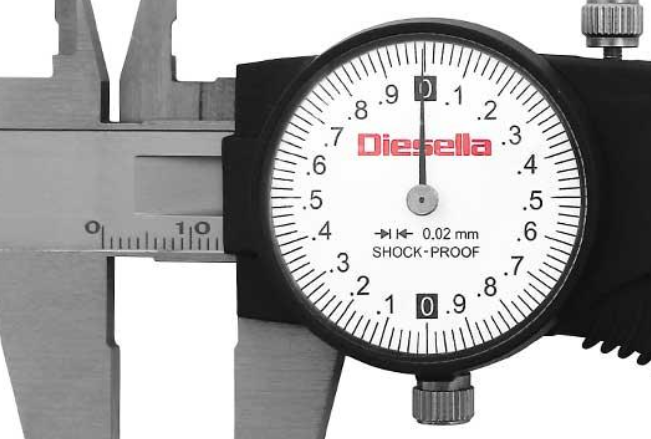
Figure 2: Step one: read the main scale (13). Step two: read the dial scale (0.99). Step three, add the numbers together and report it with units (13.99 mm)
Don’t be thrown off by the fact that your dial may be graded to different resolution than the one used in this example. Just note the resolution and make the measurement with as high accuracy as you can.
Servicing and caring for calipers
No tool is perfect for its entire lifetime. Dust and oils in the environment can build up over time or calipers can bend; causing them to wear out. Taking the time to properly care for and service your calipers, when needed, can save you time in the long-run.
Store your calipers properly in their protective case when not in use. Don’t just throw them in the drawer where dust collects. Place them into their case, the way they are meant to be - to avoid bending them, and then put them away. A quality craftsman relies on and takes care of his tools; especially those that perform precision activities.
Treat them like you would a very expensive and fragile part. Although, calipers are not the most expensive item in a shop they should be treated similarly. Use other tools to smack your workshop buddies with. Also, try to be gentle when making measurements to avoid bending your tool.
Apply grease when necessary. If your calipers are sticking, they may be rusted, burred or just a bit dry. If they are rusted, then there is not much you can do about fixing them; don’t leave them outside to endure the weather. If they are burred, then they may be able to be deburred, gently, with a file. Usually, a burr will be introduced if they are cut by another tool or dropped, so, again, treating them properly is the best way to prevent this. However, if you happen to burr them, go ahead an try and file it down. Just be sure to verify they are accurate before using them again. If the rail is a bit dry on the calipers, then apply a small amount of silicone-based grease and gently slide the calipers open and closed until they are good as new. Again, don’t forget to verify they are accurate afterwards.
About the Author
John Lecocq was riased in Texas, cut his chops in California and currently resides on Floirda’s gulf coast. He enjoys longboarding, being on the water and spending time with friends. Chat with him about anything: math, R programming, engineering, sports, good food and God.